All you need to know about the
4 Buttons Triggered MP3 Player Board with 10W Amplifier
(FN-BC04-TB and the FN-BC04)
This will include all the basic configuration files and the parts needed to get the module up and running.
We have a kit
Or here they are
(download then rename the file to "read.cfg" before copying to the microSD card. Also, make sure your file is named read.cfg and not read.cfg.txt, etc.)
How to format your microSD/TF card if your microSD/TF card is currently not formatted with a supported file system
(These same steps can be used to reformat the internal memory of the sound module itself)
Formatting the SD card deletes all the data off of the card!
For Windows:
If you are not already in Desktop View, bring up Desktop View by pressing the Windows key + D on your keyboard.
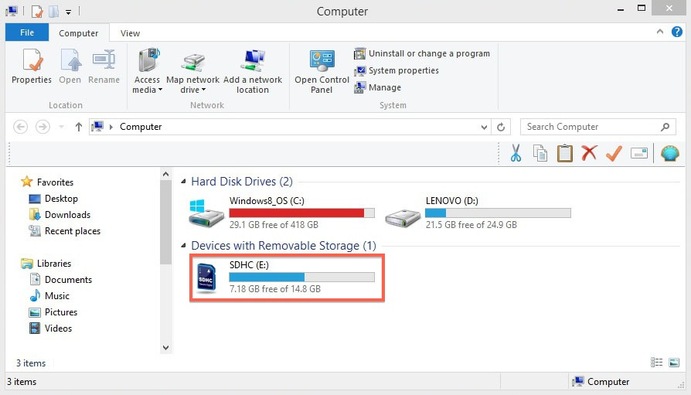
2: Open 'Computer'
Open up the 'Computer' window by pressing Windows key + E on your keyboard.

PLEASE NOTE: Save all the files from your SD card that you want to keep to your computer before following steps 3 and 4 below. Formatting the SD card deletes all the data off of the card!
3: Display right-click options
Your SD card should be displayed in the 'Devices with Removable Storage' section. Right-click on your SD card to bring up the right-click menu options. Select Format.


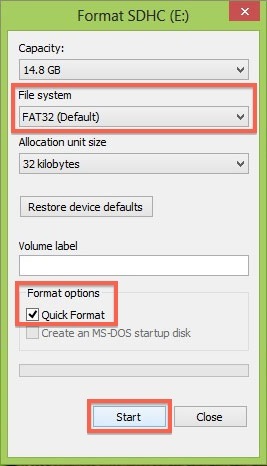
4: Format the SD card
- In the f
ormat window make sure that the correct File System is selected. It should be set to FAT32 for 32GB SD cards and EXFAT for 64GB SD cards. - Select Quick Format.
- Click Start.
- Once the formatting is complete, you can close the window.
Congratulations! You have formatted your SD card.

You are now ready to copy your MP3 files and configuration file to your SD card.
For Mac:
Formatting the SD card deletes all the data off of the card!
- Connect the SD card to your computer by using an external card reader. Save all the files from your SD card that you want to keep to your computer before moving to step 2. Formatting the SD card deletes all the data off of the card!
- Note – If you’re using a Micro SD card, please insert the Micro SD card into the SD card adapter that came with the
card . Connect the SD card adapter to your computer by using an external card reader. - Also note – Mac OS 10.6.5 or earlier does not support
exFAT format, which most 64 GB SD cards are formatted to. This means that you won't be able to format or use exFAT card on your computer. In this case, we'd recommend either upgrading your OS to 10.6.6 or later, or using an SD card that's already formatted to MS-DOS (FAT) or FAT32 to complete the below steps. - Open Disk Utility. To do this, click on the magnifying glass in the top-right corner of your computer screen. Type “disk utility” in the search box that opens, then click on the “Disk Utility” Application that comes up.
- Find the SD card in the left side of the window. It’ll be named something like NO NAME or UNTITLED.
- Click the ERASE tab in the middle of the window.
- Next, click on the “Format”
dropdown menu. Select “MS-DOS (FAT)” if the card is 32 GB or smaller. If it’s a 64GB card, please select “ExFAT”. - A message will appear asking, “Are you sure you want to erase the partition “[YOUR SD CARD NAME]?” Click “Erase”. Now the computer will delete the contents of your SD card and format it. You’re all done.